
How to Play Cyberpunk TCG

Your first run through Night City
Welcome to Night City. In Cyberpunk TCG, you're the leader of your own crew, going head-to-head with a Rival to become a Night City Legend. You'll take on Gigs, throw down with rival crews, stack up your Street Cred, and fight to become the most notorious name in the city. Here's everything you need to know to sit down at the table and start playing.
Before you start, grab a set of six dice (d4, d6, d8, d10, d12, and d20) along with your deck.
The Goal: Control the Gigs
Everything in Cyberpunk TCG revolves around Gigs, represented by dice. Start your turn with 7 Gig dice in your Gig area and you win the game. Simple as that.
Each individual die counts as one Gig, no matter what number is showing. In terms of victory, controlling two dice always beats controlling one, even if that one die rolled a 20.
If the game runs long, Overtime kicks in after the last player's 7th turn. From there it's sudden death: the moment either player has the majority of Gig dice, the game ends.
One more thing to watch for. If you're ever asked to draw a card and your deck is empty, you lose on the spot. Don't run your deck too thin.
Know Your Playmat
Before diving into a turn, get familiar with where everything lives:

- Fixer Area – All your Gig dice start here. Each turn you'll pull one out, roll it, and move it to your Gig area.
- Gig Area – Your controlled Gigs live here. The total value showing on these dice is your Street Cred, which some cards key off of.
- Field – Where your Units go to work. This is where fights happen and where Gigs get stolen.
- Eddies Area – Your currency. Sell cards from hand to generate €$ and spend them to play things.
- Legends Area – Your three Legend cards, which start face-down in random order and provide powerful crew-wide effects once revealed.
- Deck – Draw from the top.
- Trash – Discarded, defeated, and trashed cards all end up here face-up.
Reading a Card
Every card falls into one of four types, shown in the top-right corner:
- Legend – Your deck's centerpiece characters. All three start face-down; spend 1 €$ once per turn to Call a Legend and flip one face-up at random. Face-down or face-up, you can always spend a Legend as 1 €$.
- Unit – The muscle of your crew. Pay the cost, put it in the field ready to go. New Units can't attack the turn they're played.
- Program – One-shot effects. Pay the cost, resolve it, and it heads straight to the trash.
- Gear – Equipment for your Units and Legends. Pay the cost and attach it to a friendly card for a stat boost or a new trick.
Cards also use two kinds of highlighted text:
Timing triggers tell you when an effect happens, like Play, Call, Attack, and Defeated.
Keywords are standardized effects you'll see across many cards, like Adrenaline (attack the turn it's played), Blocker (redirect an attack to this Unit), and Quick (play this as a reaction to a rival's attack).
Here's what a Unit, a piece of Gear, and a Program look like on the table:
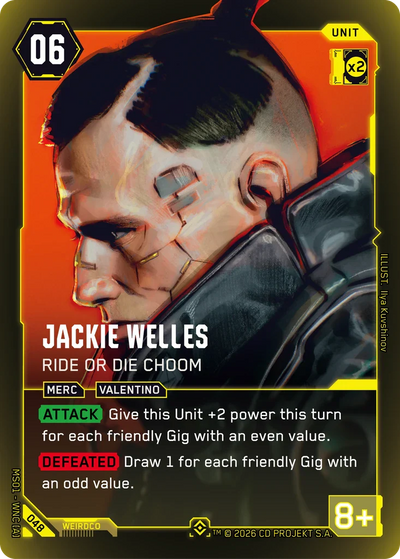
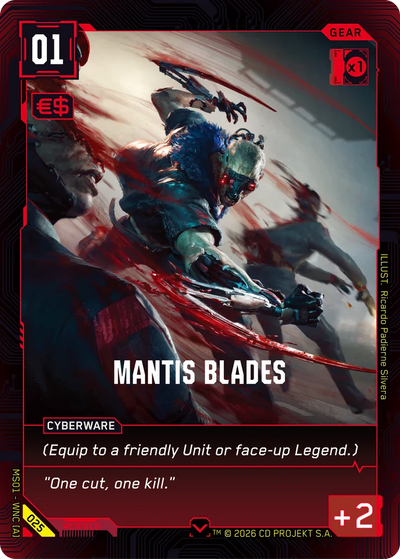
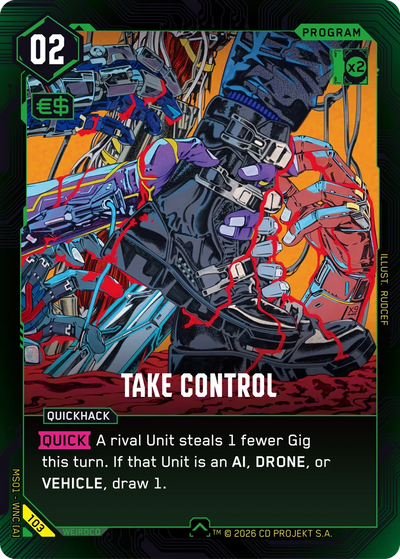
Jackie Welles — Ride or Die Choom is a Unit with an Attack trigger and a Defeated trigger, rewarding you for how many Gigs you're holding when he swings or falls. Mantis Blades is Gear that equips straight onto a friendly Unit or face-up Legend. Take Control is a Quick Program, meaning you can fire it off as a reaction the moment a rival Unit attacks, shaving a Gig off what they'd otherwise steal.
Setting Up
- Shuffle your deck and randomize your three Legends face-down.
- Roll for turn order. Both players roll a d20 (high roll decides who goes first). The player going first spends their two leftmost Legends and doesn't ready them on turn one, to balance out the advantage of going first.
- Draw 6. Not happy with your hand? You get one mulligan: shuffle it back in and draw 6 fresh.
Running a Turn
Every turn breaks down into a Start Phase and a Main Phase.
Start Phase
Run through these in order:
- Ready up. Flip all your spent (sideways) cards back to ready (upright).
- Draw 1 card off the top of your deck.
- Gain a Gig. Pull one die from your Fixer area (any except the d20, which always comes last), roll it, and move it into your Gig area.
Main Phase
From here, you can take any of these actions in any order, as many times as you're able:
- Sell for an Eddie (once per turn). Reveal a card from hand with a sell tag and flip it face-down into your Eddies area. No matter what it costs, a sold card is always worth exactly 1 €$.
- Play a card. Spend Eddies (or Legends, which count as 1 €$ each) equal to the card's cost. New Units enter the field with Lag, meaning they can't attack or use self-spend abilities until your next turn.
- Call a Legend (once per turn). Spend 1 €$ to flip one of your face-down Legends. No peeking first; that randomness is part of the game.
- Attack. Spend a ready Unit to start a fight or go after your Rival's Gigs.
Attacking, Step by Step
Combat is where the pressure really shows up. Here's how it plays out:
1. Spend the attacking Unit. Turn it sideways and resolve any Attack-triggered effects.
2. Declare a target. You can attack a spent rival Unit, or go straight for your Rival's Gig area.
3. Your Rival reacts. They can Call a Legend, use Quick effects, or spend a Blocker Unit to redirect the attack onto itself instead.
From there, one of two things happens:
If you attacked a Unit: Compare power. Higher power wins and the loser heads to the trash (on a tie, they take each other out). Defeated Units trigger any Defeated effects on the way out.
If you attacked the Gig area: You steal a Gig, and depending on your Unit's power, maybe more than one.
| Power | Gigs Stolen |
|---|---|
| 0 | 0 |
| 1+ | 1 |
| 10+ | 2 |
| 20+ | 3 (and so on) |
A quick note on defense: ready Units can't be attacked, so most of your board won't be in danger just by sitting there. But that also means only Units with reaction abilities like Quick or Blocker can actually stop an incoming attack; everything else is just along for the ride. If a Blocker redirects an attack meant for your Gigs, it turns into a straight fight, and even a win there won't steal you a Gig.
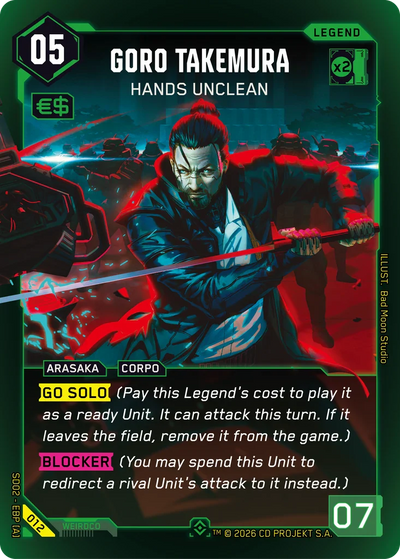
Goro Takemura — Hands Unclean is a great example of a Blocker in action. His Go Solo keyword lets you pay his cost to drop him in ready as a Unit instead of calling him as a Legend, and once he's in the field, his Blocker keyword means you can spend him to throw himself in front of an incoming attack, protecting your Gigs at the cost of putting him in a fight.
Building a Deck
Ready to build your own crew? Stick to these rules:
- Exactly 3 Legends, each with a unique name.
- 40–50 cards in your main deck (Legends don't count toward this).
- No more than 3 copies of any single card.
- Every card must fit inside your RAM limit.
RAM is what keeps decks in check. Each Legend has a colored border and a RAM value in the top-right corner, and that number sets the ceiling for how strong a card of that color can be in your deck. Want to run bigger, splashier cards in a given color? You'll need Legends that add up to more RAM in that color.
Mixing colors works the same way. If you want a two-color deck, make sure your three Legends collectively cover RAM in both colors you're running. For example, pairing two Legends with 2 Green RAM each alongside one Legend with 2 Red RAM gives you a deck that can run Green cards up to 4 RAM and Red cards up to 2 RAM.
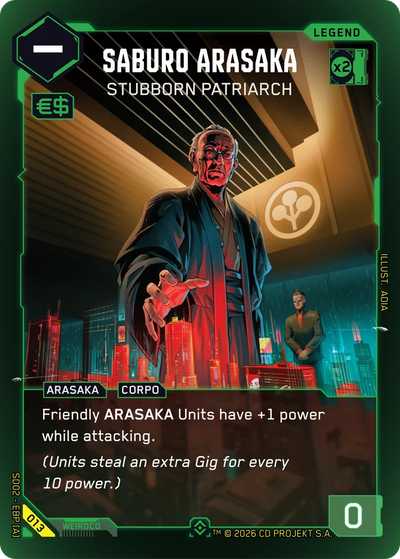
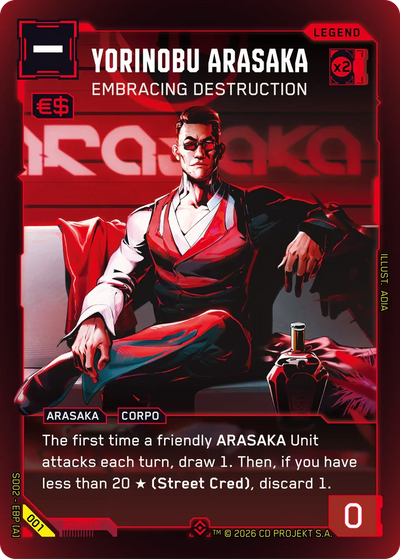
Take this trio as a real example: Goro Takemura — Hands Unclean (2 Green RAM), Saburo Arasaka — Stubborn Patriarch (2 Green RAM), and Yorinobu Arasaka — Embracing Destruction (2 Red RAM). Running all three as your Legends gives you a deck that can play Green cards up to 4 RAM and Red cards up to 2 RAM, and with two ARASAKA Legends in the mix, you're also set up to lean into an ARASAKA-tribal strategy.
Quick Reference Checklist
Before your first game, make sure you've got:
- A d4, d6, d8, d10, d12, and d20.
- A shuffled deck of 40–50 cards, no more than 3 copies of anything.
- Exactly 3 Legends, randomized face-down.
- A hand of 6 cards (mulligan once if you need to).
- A clear playmat with room for the Fixer, Gigs, Field, Eddies, Legends, Deck, and Trash.
Final Thoughts
Cyberpunk TCG rewards players who can read the board and know when to strike. Every Gig you take is a Gig your Rival can't use to win, and every Unit you hold back is a Unit that isn't threatening anyone. Whether you're grinding your way to 7 Gigs slowly and safely or gambling on a Legend flip to swing a fight, the city rewards the bold and punishes the careless.
Now get out there and make a name for yourself, choom.